Monday, February 20, 2012

IT LIVES.

Friday I got home and we got to work right away. I cleaned the frame and prepped it a bit. We mostly did some tinkering and poking and prodding, but got up at 8 the next morning and started working again.

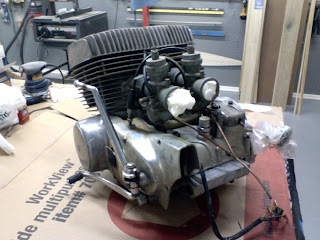
We put the engine back together (missing some parts- had to make our own washers!) and hauled it off to the car wash to get a good cleaning. The road gunk was awfully hard to get off, but we did the best we could and got most of it off. After putting it back in the frame, we looked at the carbs a little bit (could use some work, but not terribly bad) and hooked them to the intake boots on the engine. Mounted the oil tank and filled it up with CCI oil, and filled the carbs with fuel donated from the Water Buffalo; just enough to let it run a little. Hooked up the Water Buffalo's battery, cleaned the contacts and we were ready to go.

Four pumps on the hand crank to give it a little compression, five kicks on the starter, a cough and BRAMMMMMMMM!

After 30 years of sitting idle, the Suzuki roared to life. It sure was great to hear it actually make a noise other than the old tires squeaking across the garage floor. We tried it another two times and each time required less and less kicking. By the time that happened, it was 10:30 at night and we had worked the entire day on it, so we called it quits for the night.

Sunday I had no time to work on the bike, but today after I left to go back to school, Dad hooked up the exhaust and the gas tank and ran it through the gears and it sounded fantastic. I heard it over the phone, but it still sounded right. It sounds a lot like the Buffalo, but I guess all two strokes sound that way.

I got the green light to go and order/find parts. This thing's really gonna happen!

Monday, January 2, 2012

Big Titan Update!

Sorry about the lack of posts (as always with this blog), I've been busy with school.
Since I'm not around the house/garage/workshop, my Dad has been doing a lot of the work on the Titan. Last weekend I came home and we split the case. A couple of bolts broke off because they were rusted, and some screws were hard to get out because they had been chewed up so much by the PO. We had to put the engine back in the frame to get enough leverage to get the bolts out, but eventually the case was split and we got a good look inside.

The gears looked alright for the most part, and we think we solved the kickstart problem. Dad ordered parts for it off BikeBandit, as well as a few parts from a Suzuki collector in Boston. We couldn't do much until these parts came in, and once they did, my Dad got right to work. Here's an update he sent me last night:

"Here's an update on the Titan:
Today I swabbed out all the sludge from the case halves and cleaned up the case edges so we can rejoin them when ready.
I also received the parts from BikeBandit and replaced the pawl on the kickstarter.
Then I re-cemented in-place the 1400 cc capacity modification (that little rubber fence in the transmission).
Next I was able to re-install the lay shaft and output shaft (the two with all the gears)
At that point I could work the levers to shift gears in and out of neutral and all the way up to fifth and back down again.
(Really neat how that works - who figures this stuff out anyway?)
Then I replaced the kickstarter shaft and tensioned the kickstarter - it seems to work well with no "stripping" or slippage.
(We won't know for sure until...)
Finally I spent some time on the oil pump and found some longer screws so I could reassemble it where the screws were stripped...
The guy in Massachusetts has the missing head bolt so I am ordering one from him
I found a helicoil kit 8mm x 1.25 pitch at O-Reilly's so we can re-thread that stripped head bolt when you come home next.

So when you are here we can:
Run some oil through the injector lines to verify they are clear
Check all the parts to be sure they are in right and pre-oiled, no binding etc.
Apply silicone cement to the case halves and re-join the case
Install the new seals and torque all the case bolts
Install that Helicoil in the bad cylinder
Re-fit the pistons, cylinders and heads and torque the bolts
Install the Oil Pump
Then cover the intake and output ports and take the engine to the car wash for a thorough Gunk cleaning
Maybe clean up the frame a bit while the engine is out.
Finally put the motor back in the frame!
Then, when we have time, hook up the carbs, throttle, battery and oil tank, and see if she'll run..."

We've gotta work our butts off this weekend, because I have a small window of time and I'm dying to see if that engine will turn over! I'm sure it will, but i just can't wait to hear it. Once that engine putters to life, that's my green light to start ordering more parts and start polishing the hell out of it. I get home Friday at around 2pm, so we've got Friday night, all day Saturday and probably until dinnertime Sunday to get stuff done.

Exciting! Pics (and video, if we get the engine mounted) next week.

Sunday, November 27, 2011

Dropping Out.

My Thanksgiving break brought me plenty of opportunities and lots of time to get stuff done.
However, I wasn't as productive as I wanted to be.
Hanging posters in my room? Nah. Working on an essay and making webpages for class? Nope. Catching up on LEGO building and sleep? YES!
Yesterday (my last day of break) I finally got off my ass and did something.

Dropping an engine is pretty self-explanatory (unplug/detach everything), but now that I had my "imported" (eBay UK) Titan manual, I was going to put it to some good use. I need to get used to Brit spellings and wordings. You can definitely tell it is British as soon as you open it.


After detaching everything and scrambling for fallen parts, my dad helped me wiggle the engine out of the frame. I thought it was going to be a piece of cake to handle because it seemed smaller than the CX500's engine, but I was wrong. That engine is HEAVY!


We lugged it downstairs to the basement where it is currently sitting on the workbench waiting for me to return for Christmas.


I've got three weeks or so to work on it next month, then a few random weekends off and Spring break next semester. Hopefully I can get a lot done before May! I really want to enjoy it (ride the hell out of it!) for awhile before I sell it.

Sunday, October 30, 2011

Crash Bars!

I went home this weekend for some R&R, and wound up being sick on the only day good enough for riding. I brought the crash bars home and soon realized that these probably aren't CX500 crash bars. The mounting points didn't match up as well as they should have; this could have been off a '78 CX500D, since I believe that's the most different CX out of the whole 500 line (Within the C, D and GL5/650 lines of course, excluding the Euro, Turbo and CX650 variants) Or this is off a CB550 or something. But who cares, we got it on anyway.

Note the extension bracket under the reflector.

Since I wasn't able to hang around the garage all day, my Dad did most of the work. For the extension bracket, he repurposed some chromed steel from a handlebar-mounted fuel can luggage rack he had made in the '70s for his GT750. Our welder wasn't around, so he double bolted the bracket together; it should hold pretty well.

A little later in the day, I felt well enough to take it out for a spin. The highway pegs on the bar are kind of a pain in the backside; they're cheap generic pegs (most likely an aftermarket rear set) mounted to the bar and they wiggle like crazy. When you fold them up, they hang loosely. When you ride with them, they are SO loud from 20-60mph. Once you reach 60, they pretty much stop vibrating. I like the option of having them because it's nice to be able to stretch your feet out in front of you (at the expense of looking really funny) when riding far, though the position lets air flow into my pant legs and makes them balloon up, while freezing my legs off at the same time.

I'm going to buy a slim, solid foldable set to replace these; I don't plan on using it that often and I can't ride one more time with that nuisance in my ears. I could fix them and make them work, but I like the look of the thinner, all-chrome ones.

Aside from that, I think they look really good. It complements the larger tank and makes the front end overall more beefy. Oh, and it won't screw up my engine if I drop it. That helps too.

Well, I hate to say it, but that was my last ride of the season. Tank is filled with gas and Stabil, battery's removed and its tucked away in the garage until April. The T500 however, is going to be getting quite a lot of attention over the next few months. Waiting on a service manual from the UK to be delivered!

Tuesday, October 4, 2011

Crash Bars!

I've waited years for the right crash bar to show up.

And here it is :)

No rust except for a little light surface rust on the brackets and a little scuffing on the sides. Other than that, it's the right size and condition I wanted. I mean, it would be awesome if I could get 100% new ones, but I got a great deal on it. Not sure if I'll keep the footpegs on it, I'll have to see if I like them.

I just wish I had found this earlier! I'll put them on the next time I go home and winterize my bike.

Wednesday, September 28, 2011


I realized I have a lot of tanks. Plans?
The tank on the far left is an '80 CX500C tank. Full of rust, sounds like its filled with sand when you shake it around. Petcock is useless, and the bumpers were sacrificed for the working CX. Uses? gas cap, gas cap lock and the back half can be hacked off to make a cafe seat.

The middle tank(s) is off a Harley Fat Bob (Don't quote me on this), and are of no use to me. They're banged up pretty bad and they won't sell. A neighbor gave them to me. Trash can?

The shiny tank is another '80 CX500C tank. I'll keep it around for shits and giggles, though I can't see myself putting it back on any time soon. It took a day to get the CX500D modded so it would fit right, and it has twice the fuel capacity and just looks cooler.

The brown tank on top is off the '73 Titan. I've been looking around for other Titan (And GT line tanks, they'll fit) if the stock one I have doesn't work out. Hoping the 20 year old Bondo on it will sand down. If there's luck with that, I know a guy that can paint it professionally. Should have done that with the CXC tank the first time (rattle can jobs are useless once gas is spilled on the tank).

UPDATE 2/12:
The Harley tanks (as well as the banged up exhaust and windshield) were given to my cousin, who knows what he will do with them. Cool, because they are of absolutely no use to me and wouldn't sell on eBay.

Monday, September 26, 2011

T-500 Update

After a whole summer of hemming and hawing over whether to sell the T-500 for scrap or not, college caught up to me fast and the topic was sidelined yet again. Two weeks after I moved away for school, I received a notification from eBay that my family's account had purchased a T-500 starter gear. I hadn't ordered the part, and an email to my Dad confirmed that he was interested in working on it again. Finally, he agreed that a little investment into the T-500 would certainly be worth it. I went home that weekend and started tearing the little guy apart.


After taking off the seat and tank, I removed the side cover/oil reservoir and drained it. It was a lot more full than I had expected! The airbox was already removed as well as the battery, so I worked on cleaning the rims up with WD-40. They polished up super well with just that, so I figured I'd just leave them be. After removing the exhaust, I was disappointed to see that the headers are beyond a decent polish job. They're pretty atrocious, and I'll have to look for a new set soon. The pipes themselves are okay, they have a few scratches and gravel dings on them, but they're not terrible. After an hour's worth of scrubbing dirt off with WD-40 and 3 applications of chrome polish, they turned out pretty good.

The chain guard was a real PITA to clean, as it had big globs of tar on it. In this situation, Bug+Tar remover doesn't help no matter how hard you try or how long you soak it, so my Dad suggested I use brake cleaner or carb cleaner. Worked like a charm! Shined it up pretty well too, didn't marr the chrome or anything.

Then it was time to take it to the car wash. I had waited for this moment for two years! I hit it with the hose this summer, but nothing beats a real pressure wash and a whole can of engine degreaser. We ran up to Menard's, rented a truck for 25 bucks, bought an 8 foot 2x4 and drove back and loaded it up and strapped it down and drove to the car wash. It looked great after that!

Didn't get any pictures after that, but I'll get some when I come home. Next time: dropping the motor, hauling it to the workbench and an inspection! Maybe some carb work. Keeping an eye out for any year 500 fender and misc. rubber parts.